Basic Blender to SVG Tutorial

After I posted about using Blender to output the stylized SVG of my head 3D model to plot with my AxiDraw, I wanted to do a basic tutorial since the settings I used in that post were specific to that technique. Sometimes you just need a simple version to spark your own explorations, and not get overwhelmed by stuff you won’t need on day one.

Since that first post, I have been introduced to the world of illusion edge-lit acrylic images. These are what appear to be wire-frames of 3D models, floating in mid-air, hologram-style, engraved into clear acrylic and edge-lit with LEDs. Since I recently received my Glowforge laser cutter, and other owners have been engraving pre-made designs, I realized the previous Blender to SVG technique is able to give us the right output to do our own custom designs!

Here are the steps to take a 3D object and output it as a SVG suitable for engraving (or scoring) on a laser cutter, or just for rendering a nice view of a 3D model. I’m going to use a single model, but you could set up any scene you want and follow the same steps.

NOTE: I’m using Blender 2.78b, and have enabled the “Freestyle SVG Exporter” add-in (in the Render section of Add-Ins in Preferences). I’m also using the Cycles renderer, not the Blender renderer as it may not have all the same abilities (depending upon version). Different versions of Blender may look slightly different, or you might have changed color schemes, but the functional steps should still be the same.

Step 1

Starting with a blank scene, add a new object. In this example I added a UV sphere with 32 segments and 16 rings.

(Click any picture to enlarge)

Step 2

In the Render panel, scroll down to the Freestyle section and enable it.

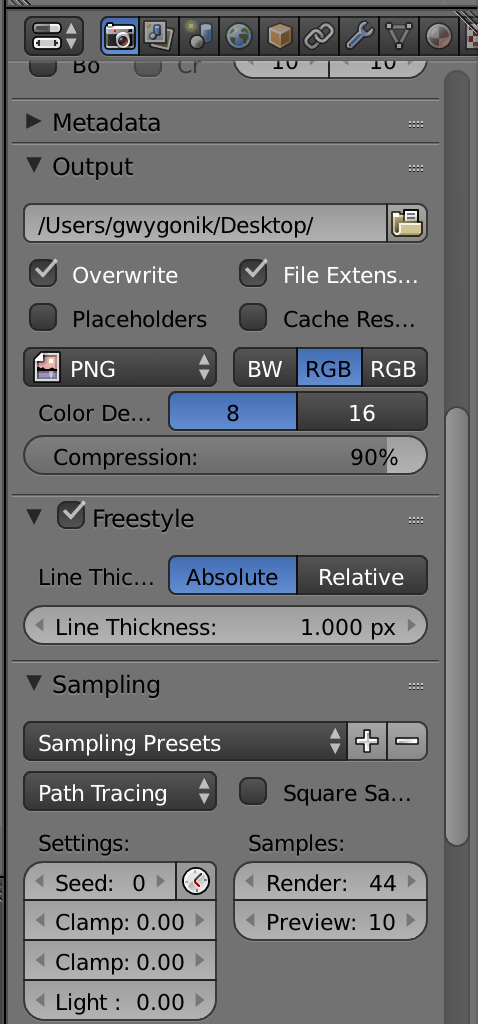
Just above that is the Output section. Change the output location from the default (normally “/tmp”) to some location that is easy to get to. This is where the Freestyle SVG exporter will save your image.

Step 3

In the Render Layers panel, you will find several new Freestyle-related section. You’ll first want to scroll to the Freestyle Line Set section.

Click the little “+” next to the empty area and you’ll get a new line set called “LineSet”.

Step 4

Scroll down below that section to the “Freestyle Line Style” section. You may have to click the triangle at the left of the section header to expand it. In this section, select the “Color” tab and change the color of your lines from something other than black (I chose a light blue in this example)

Step 5

Set your Blender camera to a nice looking position and render!

Yeah, that’s not very impressive. Yet.

Step 6

Head back to the Render Layers panel and scroll down to the Layer section. There you’ll find checkboxes (normally enabled) for “Use Environment”, “Use AO”, “Use Surfaces”, and “Use Hair”.

De-select all of these checkboxes.

Render again and you’ll see just your lines! But they’re still not very interesting… just an outline of your model.

Step 7

Now the magic.

Select your model and press the Tab key to enter the Edit Mode view (or choose Edit Mode from the main window’s drop down). This should start with all vertices and edges selected and highlighted (orange by default).

Switch selection mode from Vertices to Edges.

Press the A key on your keyboard to deselect everything. Press A again to make sure all the edges of your model are now selected and active (orange).

From the Mesh menu, select Edges -> Mark Freestyle Edge.

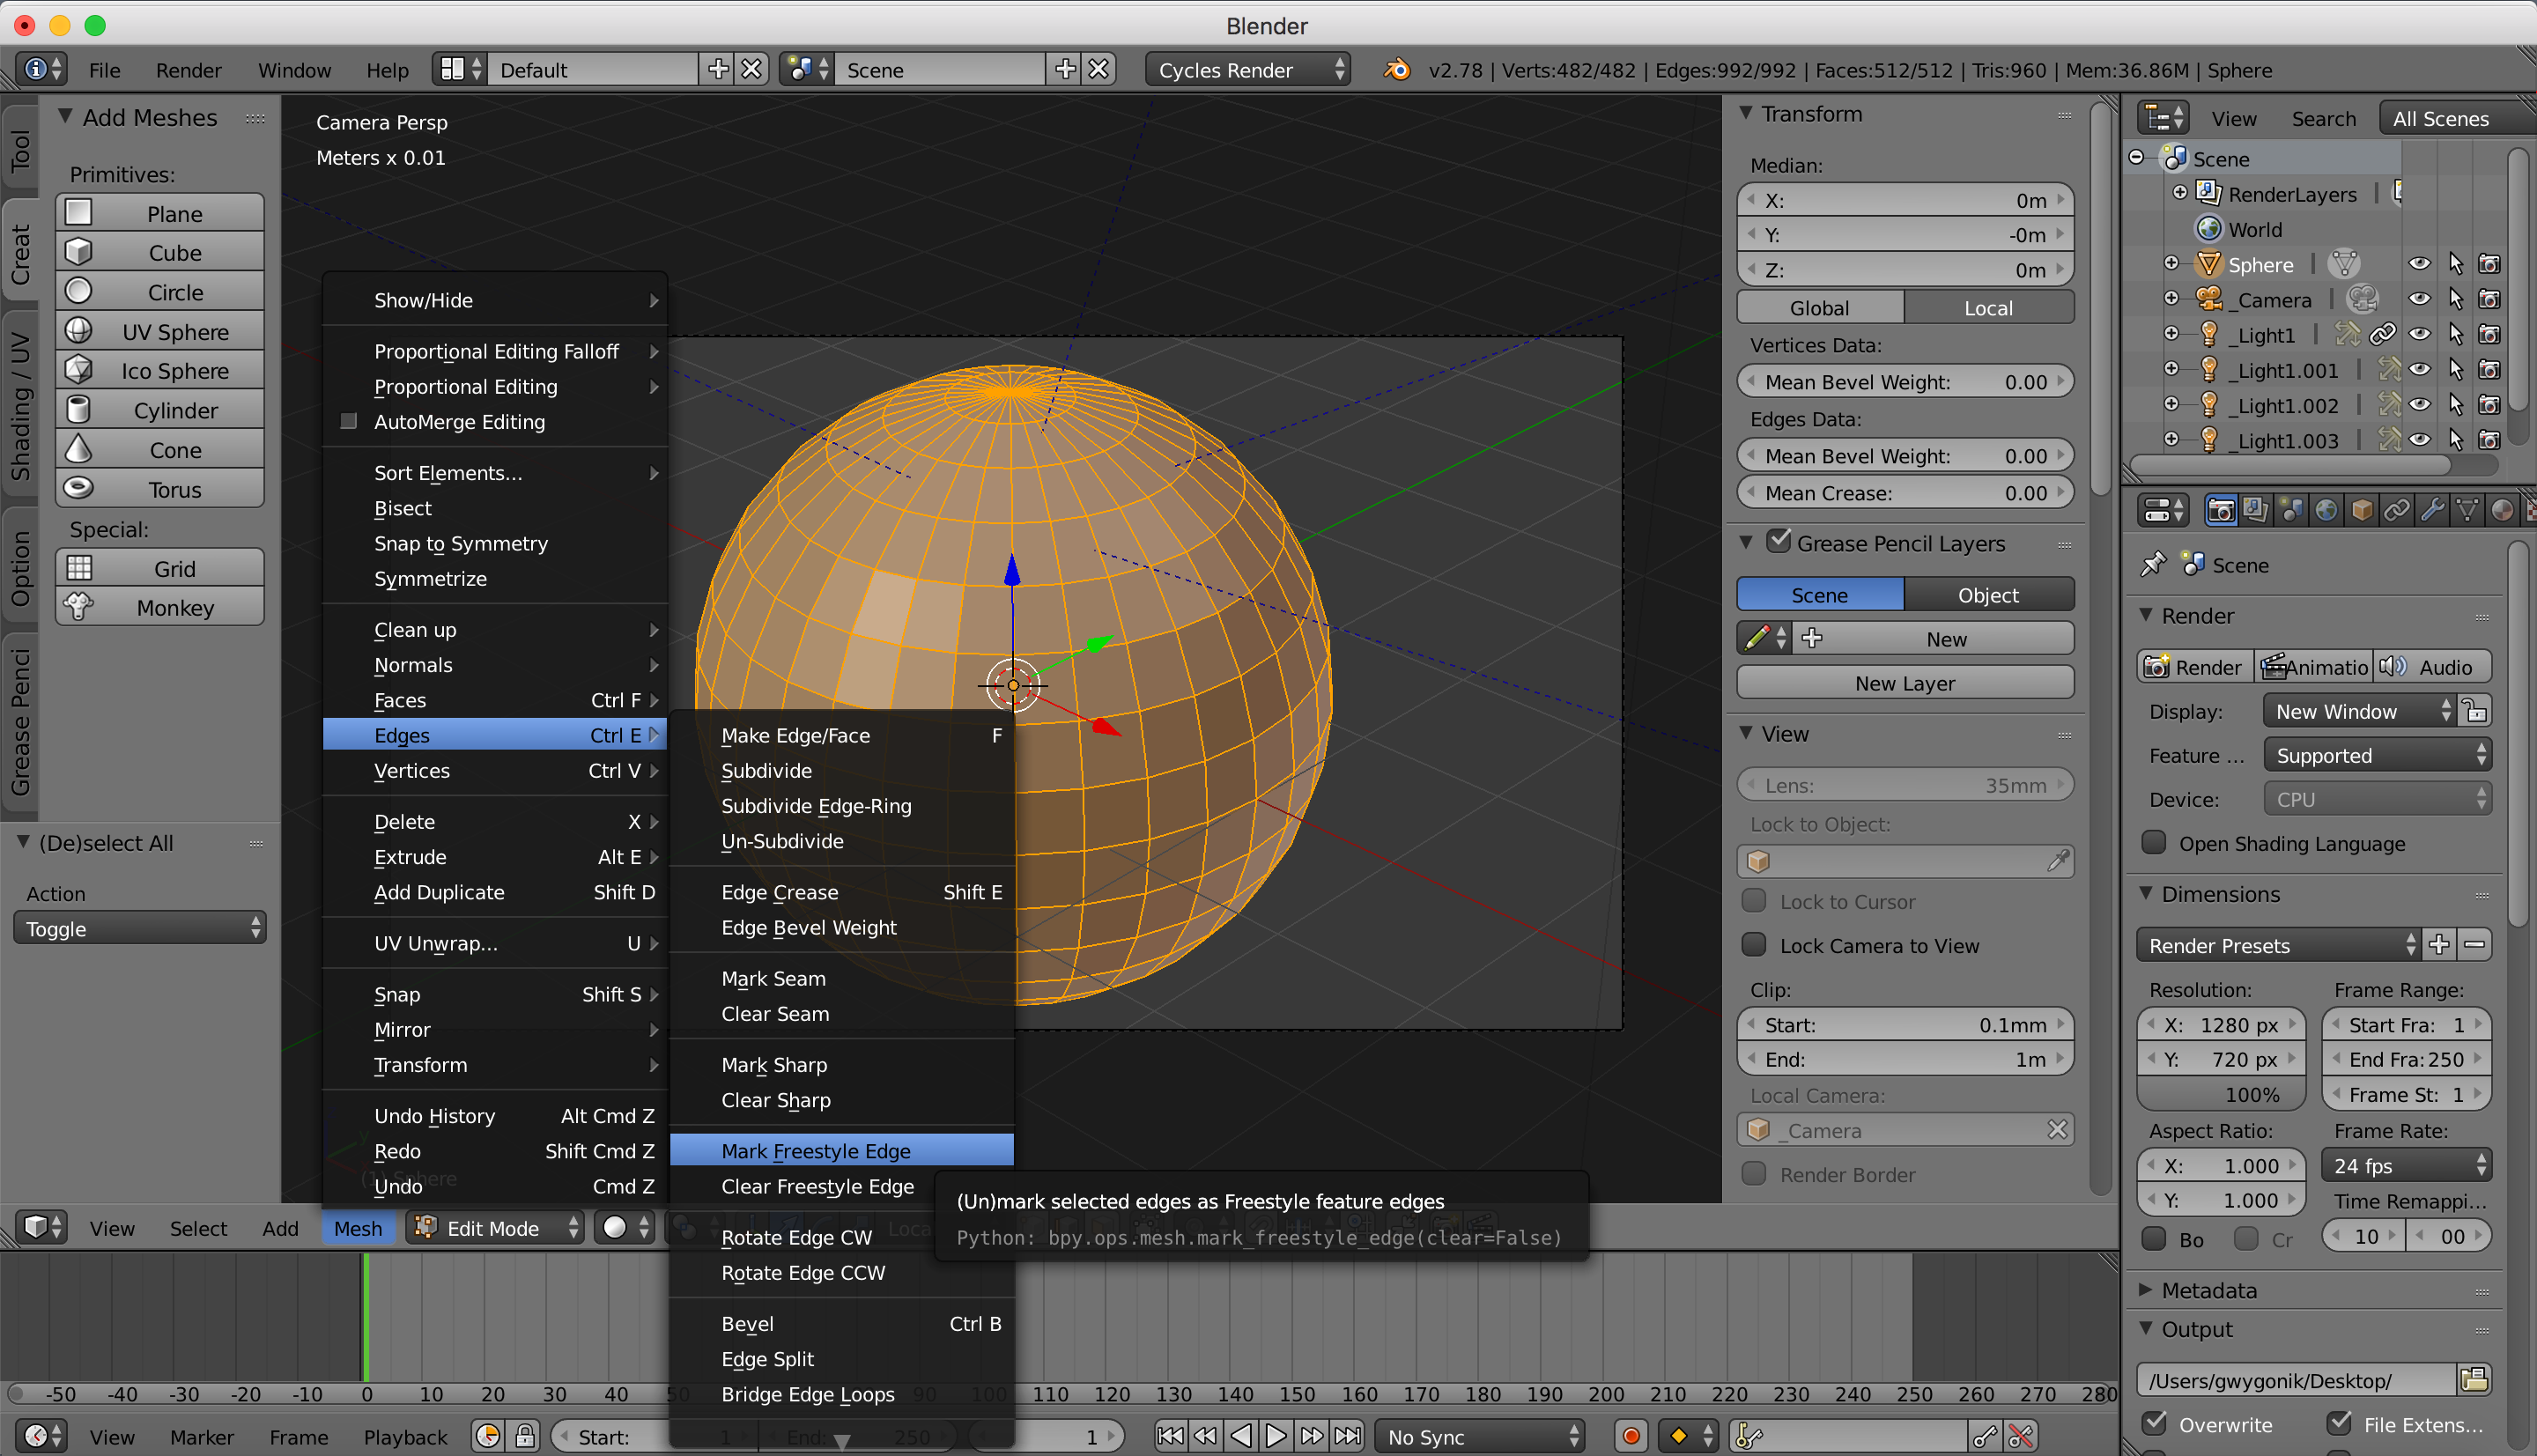
Your edges will all turn yellow.

Step 8

Render!

Wut?

Step 9

Back in the Render Layers panel, scroll to the Freestyle Line Set section and you’ll find a checkbox labelled “Edge Mark”. Click the checkbox to enable it.

Step 10

Render!

Wooooooooo!

Looks great but now we need a SVG.

Step 11

In the Render panel, all the way at the bottom you’ll find a section labelled “Freestyle SVG Export”. Click the checkbox to enable this section, and thus the exporting of your lines.

Bonus: Just above the Freestyle SVG Export section there is a section titled “Film”. In this section you can check the checkbox for the Transparent option. This will make sure there’s no background in your image (while I’m not 100% sure this outputs anything in the SVG, it is useful for compositing wireframes into other images).

Render!

Step 12

Navigate on your computer to the location you set for the output in step 2. There you will find a SVG file, most likely named “0001.svg”.

The file name is based on the current frame of your timeline. Since we started with a new scene and have not added any keyframe, animations, or have made any changes to the timeline, we are on frame 1 — thus 0001.svg.

Now you can take this SVG and plot it on a pen plotter, engrave it with a CNC or laser cutter, or whatever else you want to do with a SVG file!

Here is a model of a cone that I used this technique on, scored it into clear acrylic with my Glowforge, then edge-lit it with a RGB LED.

Tips

  • Sometimes objects don’t have as many edges as you might want. You can use the editing tools in Blender to subdivide certain sections, manually add edges, or use any of the mesh modifiers to design the edges you want.
  • Sometimes there are edges you don’t want to have in your render, or so many edges in a small section that they appear to be solid. While I marked every edge as a Freestyle edge, you can mark individual edges to get just the ones you want. Additionally there is the Clear Freestyle Edge option in the Mesh->Edges menu if you want to un-mark edges to make space.

Have fun!

Is it jewelry if there are no jewels?

Brooch front

I’ve said before that the aesthetics of the Form 1 make me want to 3D print artistic things, not mundane things. Over the past 6-7 months, as I’ve messed around with smaller, more refined 3D objects, I’ve inadvertently strayed into an area that I have had no previous experience with: jewelry.

Continue reading

Unlocking the future. And gumball machines.

gumballOne way to keep morale up in a high-pressure, high-stress work environment is through candy. Lots and lots of candy. One of the guys at the office brought in several gumball machines he has and filled them with delicious sweets, mostly different flavors of M&Ms. Unfortunately while trying to unlock one of them he pulled the key out without it being aligned properly, thus making it impossible to get the key back in the keyhole. Co-workers tried all sorts of ways to get it working, but no luck. Finally one guy remembered I had 3D printers and asked if I could help and, well, I’m always up for a challenge.

Continue reading

Tiny chairs with the B9 Creator

[ UPDATE 02/23 – Added new gallery of macro shots at end ]

The last couple of years was both crazy and cool–getting to be part of the process from initial ideation to final release of a major consumer electronics device was quite the experience. Over the past six months, while I had time to make things, I didn’t have the brain power to write much. Since I’ve recently moved to a different product division, back in the ideation phase, my “little gray cells” have had time to catch their breath and also given me time to start writing again.

The first thing to get out is something I meant to do a long time ago: talk about 3D printing tiny chairs with the B9 Creator 3D printer.

B9 Creator Tiny Chairs

Continue reading

Formlabs Clear versus Shapeways FUD — a comparison

UPDATE: Fall 2017

In this rapidly-changing, technology-driven world, what is relevant one day can become meaningless the next. This post has some good info but IS HORRIBLY OUT OF DATE! 🙂

What I mean is that in the last four years since I wrote this post, there is a new version of the Form 1 (the Form 2) with new formulations of resin, and Shapeways has updated their materials a lot as well. While I’m tempted to remove this post, I think the ancillary information and anecdotes are still good, even if the quality comparison in today’s market is meaningless.

The works I’ve seen coming off the Form 2 are super-quality (I still only have my Form 1+), and I’m pretty much only using Shapeways for metal and porcelain prints these days, so I am not able to update with new useful information. Take this post with that grain of salt. 🙂

—–

In certain circles, FUD means “fear, uncertainty, and doubt”. To others it means Shapeways’ “frosted ultra-detail” 3D print material. Yet to others FUD has an entirely different meaning. Today we’re talking about the Shapways 3D printer material, and how it compares to the Formlabs Clear resin.

A couple of weeks ago I printed a tiny robot pendent and a tiny mech pendent and posted them to Thingiverse. I posted pictures of the prints from my Form 1, which led to discussing the Form 1’s quality with Kacie Hultgren of Pretty Small Things fame. While she is able to print a number of her miniatures on her Makerbot, she also uses Shapeways for items with small details, and is considering adding a Form 1 to her workflow. We decided it would be great to test the Form 1 Clear resin and Shapeways FUD side-by-side and learn what was to be learned, so she emailed me three of the STL files she previously had printed by Shapeways and I got to work.

Continue reading

Now there’s fun to be had!

Finally! After a month in cramped temporary housing, we’ve settled into a nice rental house in Redmond, Washington where I can once again begin my 3D printing journey. I even have a dedicated space in the garage for leaving my Thing-o-Matic set up! Yay!

Over the past month I’ve been amazed and inspired by the landscape, flora, and fauna of the Pacific Northwest; this place is definitely having an impact on how I look at the design of everything. The driftwood above even reminds me of the sliced cardboard assemblies of 3D models. Of course the cool temperatures should also make for a better quality experience (both living and 3D printing) than the 100+ degrees in Austin. 🙂

Updates soon!

Smart kids and 3D printers

Thanks to my co-worker Brooks, I had an opportunity to sit with my Thing-o-Matic and a loaner Replicator (thanks Makerbot!) at the ACE Academy Innovation Fair here in Austin yesterday. The Innovation Fair was kind-of like a normal school science fair, but included guest speakers, a proclamation from the mayor (officially it became “ACE Academy Innovation Day” yesterday), and more. Unlike normal science fairs where kids have dioramas of the earth’s layers, or maybe a hamster in a maze, these kids had exhibits like new, innovative forms of lightning rods for houses, cool robots, 3D LED matrix cubes, and a new type of “flame in a can” over which they were roasting marshmallows.

I knew the day was going to be awesome when as soon as we put the Replicator on the table, a tiny little girl (I say in the 6-year-old range – no lie) complete with plaid dress, bows in hair, and glittery shoes walks up and asks excitedly “Is that a 3D printer?” to which I, in shock, replied it was. “That’s so awesome! Well I’ll be back when you’re printing something.”

Continue reading

Crickets

Have you noticed that things have been quiet here for a few weeks. In May my wife and I will be moving from Austin, TX to Seattle, WA, and have been preparing for the move for a while now (though we still haven’t packed).

While I have been 3D printing things here or there, I’ve not had the opportunity to document as I normally would due to other, more pressing, matters. The lull in posts is simply a temporary thing; once we’re settled after the move there will be some fun new posts (and maybe even some new gear to talk about) 🙂

Moving on, city to city.