
 One way to keep morale up in a high-pressure, high-stress work environment is through candy. Lots and lots of candy. One of the guys at the office brought in several gumball machines he has and filled them with delicious sweets, mostly different flavors of M&Ms. Unfortunately while trying to unlock one of them he pulled the key out without it being aligned properly, thus making it impossible to get the key back in the keyhole. Co-workers tried all sorts of ways to get it working, but no luck. Finally one guy remembered I had 3D printers and asked if I could help and, well, I’m always up for a challenge.
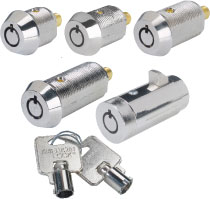 The lock on the gumball machine was a tubular cam lock — those ones with the cylindrical opening with 6-7 little springy pins in them, and a key that has various ridges to align to the pins. The key has a bump on the outer edge of the cylinder that aligns with an opening on the lock. You put the key in the lock with the bump into the opening, then you can turn the key and unlock the lock. When my co-worker’s key came out, the lock no longer aligned with the opening, making it near impossible to get the key back in. It seemed like all that needed to be done was have a key without that bump, and of course all the various ridges in the right places. I brought the key home and started getting to work, taking measurements in many different ways.
The Specs
- The key had six indentations of varying depth – from 0.25mm to 2.5mm – each offset at a small angle around the cylinder.
- There was a 1mm pin going down the inside wall of the cylinder, just slightly off-center.
- The inner walls where the indentations are were only around 0.3mm thick at the thinnest part, and I wasn’t sure those would even print as that is the smallest feature size for the Form 1.
- I left the outer bump off so that we could get the key back into the lock at any angle.
If any of these are not right, the pins won’t press down correctly and the key won’t turn.
-
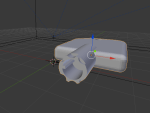
- Key in Blender
-

- Cylinders subtracted from tube to match pins
After a quick trip through SketchUp and Blender, I sent the STL to my Form 1 to print, and a few hours later I had three keys that looked just like the original (just clear).
Taking the 3D printed keys into work, we tried the first one and it fit perfectly and started to move! But as we were twisting it, the tubular part snapped in half; it was really thin and I didn’t do any post-print curing that might have hardened it. Luckily the broken part came out easily with a pair of needle-nose pliers.
The next key we were more careful with as we turned it and it worked! All of the various ridges pushed in the pins just right, and we were able to get the lock turned around to be aligned with the bump opening, at which point the real key fit back in and worked as it should.

Score one (more) for 3D printing and the awesome Form 1! Candy all around!


Do you have the files of this model?
Heh – no. Due to the possibly nefarious ways to use such a key, I’m not releasing the files for this model. I’ll leave it to the reader to make their own. 😉