
Every weekend, my wife and I try to get out of town and visit some neighboring city, island, mountain, or valley. This past weekend was no different — we hit up the 170+ antique stores in Snohomish, WA. While looking through the items from days gone by, I saw two “things” together in a case that made me immediately think of my Makerbot, and I had one of those “I can make that” moments. Or, rather, “I can remake that”.
A little over 100 years ago, a scientist created an early plastic called “Bakelite”. While still in use today for some toys and specialty parts, there was a time in the 30’s and 40’s (and possibly later) where companies crafted various napkin rings in animal form using Bakelite.

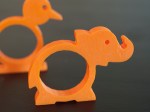
Bakelite animal napkin rings in antique store
Today you can find, like I did, these napkin rings in antique stores, as well as on eBay, etsy, et al. While somewhat common, some can still bring big bucks. I came across a rabbit and a bird, and checking online when I got home, saw that the rabbit can go quite high ($90+ in some cases), while the bird starts at $1 but can go up to $80+.
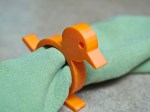
Now, perhaps unlike the rest of the country, my wife and I still use cloth napkins, so I can still see an occasional need for napkin rings (well, very, very rarely). Regardless, the charm of these vintage napkin rings grabbed me: they were incredibly simple in design, basically a silhouette of the animal with a hole in the middle for a napkin, and extruded somewhere between 1/4 – 1/2 inch.
To start to design new versions, I first checked online to see what existed previously. Obviously I knew about the bunny and bird, but was excited to find there were elephants, fish of various shapes, chickens, different birds, and even different styles of rabbits. If imitation is the sincerest form of flattery, I figured I’d start by recreating the bird I saw, as well as an elephant.
I could have grabbed a photo from the internet, brought it into SketchUp and simply traced the edges, but I wanted to start from square one. So I did a search online to see the average inner diameter of modern napkin rings, which ended up being around 1.25 – 1.5 inches (31mm – 38mm). I went with a size on the higher end of that scale — 36mm.
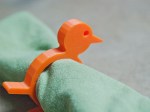
 Drawing the circle with a larger circle around it, then removing the inner circle’s fill created the basic ring shape and I was up and running. The bird was first as it was the more simple of the two designs I wanted. A single, long “foot”, a tail, and a circle for a head with a triangular beak. One of the things I liked about the vintage ones were the rounded corners instead of sharp ones; these seemed to add a bit of whimsy to them and something I wanted to copy. Unlike the vintage ones, however, I did not put the small ridges on the top of the head, nor make the beak conical; I wanted to keep the first one really simple. The bird took all of 5 minutes to draw.
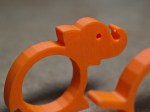
I extruded the bird to about 3/4 inch and, after switching to my Safety Orange filament, sent it to my Thing-o-Matic to 3D print. While it was going, I decided to start working on the elephant. I started with the same inner circles, easily added the “tail”, and then tried to work out the head. This proved to be quite difficult to do just by using SketchUp; ironically, I felt I really needed to sketch the shape with a physical pencil to get it just right.
 By this point in time, my Thing-o-Matic was halfway through it’s process and I noticed that the edges around the feet (well, foot) of the bird had started to lift off the build platform. But I also realized that where it had gotten to was really as thick as it needed to be. A quick measurement showed around 9mm, so I rounded up to 10mm for the thickness of the next 3D print. I re-sliced, re-leveled the platform, and re-sent the file to the machine. This time — perfect. While the second bird was being produced, I finished the elephant’s head and was ready then to send it on as soon as the bird was done.


Making these two napkin rings was super fun as I got to sketch (both digitally and physically), think about how to turn simple shapes into cool things, and how I just saved myself possibly over $100 for the two Bakelite ones I saw in the antique store. They were so much fun that I couldn’t stop there.
I grabbed another piece of paper and started sketching out some more animals — or “zookins” as I decided to call them (think: zoo + napkins).

Hedgehog and turtle “zookins” in SketchUp
Based on the tail of the elephant, I knew I wanted to do a turtle, so that was first. Something about the turtle sparked a thought of a hedgehog and that little guy proved to be quite easy. My wife suggested a bat, but I totally blew that one despite multiple attempts at drawing different styles. A quick scan of my drawing paper, an import into SketchUp (scaling up so my circles were 36mm diameter), and I had an easy time of tracing my two, new, zookins.
I love when a plan comes together, and I can take something I see and translate it into something I can hold in a very short amount of time; having a 3D printer allows me to look at things around me and see many more opportunities than I had without one. Situations like these are great because they keep me on my toes — you never know when and where inspiration will hit you, and it’s great to be prepared with the right tools.
Click here to view and download the STL files for all four zookins from Thingiverse.


Great post!!! I love seeing your design process.
Thanks, Patrick. I think the design process — even for simple things — is something lacking in a lot of the 3D printing talk, and I’m going to try to show more of it.
3D printing isn’t going to be a mainstream, “in every home” tool until folks realize that they can make THEIR ideas real, not just what they find on Thingiverse. 🙂
Hmm, we use cloth napkins a lot and have no napkin rings… these are neat. Another nudge towards wanting a 3D printer of my own…
Which leads me to wonder: do you think the MakerBot would be able to print up reasonable substitutes for these Wegen guitar picks that I like? http://www.wegenpicks.com/images/bluegrasspicks.jpg
They’re 1.4mm thick; and those grippy holes are probably 2-3 mm across.
Hey Rob — I think it would be able to print those. I base this on the various guitar picks already on Thingiverse: http://www.thingiverse.com/tag:pick 🙂 While I don’t want to take money away from mom and pop companies, if you want to send me an up-close pic of the pick (teehee) next to a quarter (yes, the coin), I can see if I can model and print one (or 20).
Good point about not taking money away from small companies with unique products—but it still does boggle my mind that they get $15US for a 4-pack of those things. The only one I currently have is worn everywhere, so after I support them with another pack maybe I’ll get a pic of a brand-new one to have you try printing a few for-research-purposes-only backups 🙂
The first thing I thought of when I saw your files on Thingiverse was how similar they were to some “cheater chopsticks” that we have. You could print some to use in conjunction with your napkin rings next time you have Chinese (or Japanese or Thai) 😉
Oops… meant to attach a link:
That’s a great idea Charles. I think a 3D printer with a big enough build platform should have no problem with these (think: Replicator 2, Type A Machines Studio 1, etc). The only potential downside would be that none of the at-home 3D printers currently have food-safe extruders, despite potentially food-safe plastics. 😦
Can you elaborate on “no food-safe extruders”? I’m curious about what the concern is. My extruder is made from PEEK and stainless steel. Aside from some oils on the steel from the manufacturing process (which would probably wash off in the dishwasher), I can’t think of what might be dangerous in there.
Well I’m certainly not an expert on the topic, only going by anecdotal reports from various 3D printer forums where there’s much debate online as to food-safeness of various parts of common extruders — perhaps not yours as it sounds quite uncommon. 🙂 Between the potential for lead in brass nozzles, to the additives in colored PLA, to what the extruder used to make the PLA is and if it’s food-safe, there seem to be several vectors for getting out of safety specs. Of course, I don’t think this has actually stopped anyone from using PLA (and even ABS) cookie cutters, shot glasses, burger presses, etc. 🙂
My mistake… my extruder is not just SS. It is aluminum, PTFE, PEEK, copper, and Stainless Steel. Most likely the plastic only touches the PTFE and aluminum, but I can’t be sure. Like you, I’m not sure what is in PLA, but ABS has a long record of being safe (many Legos get chewed on without any toxicity). And ABS is dishwasher-safe, so you can clean the outside of the parts pretty well if you want. I think there is also a big difference between a general “food-safe” category and an official, FDA “food-grade” category. Anyway, keep up the great work on your printing blog… I really enjoy reading your updates!
Yeah – I personally don’t have much problem with it all, especially after a good washing, but I also don’t want to be telling folks “it’s safe” when I have no idea 🙂
And thanks for the kind words! I will keep posting as long as I have ideas and things to say about them. 🙂
Fantastic!
I have a 1930s lifestyle and everything (yes everything) in my home is from that era, except obviously this computer.
I generally don’t like anything modern but from the day I learned about 3D printing I was interested and was wondering if I could use it to create copies of vintage items.
Great to see you doing just that!
I look forward to 3D printed ‘bakelite’ telephones, toys, radio cases and one day even furniture!
Very exciting.
Thanks! I have an affinity for early 20th century design (even late 19th) so I love being able to bring back to life some of that work. I also like taking that aesthetic and creating new things with it — for instance my Art Deco base for a cheap IKEA lamp: https://myplasticfuture.com/2012/07/22/an-age-of-optimism-again/
What I love about the promise of 3D printers is that everyone will be able to take what they like and bring it forward and/or create something new, and not just forced to be content with what they can buy in a store.
🙂