
Time to get ugly! No, no… not that time – that was 1989. Now it’s time to fix my broken watch with my 3D printer in my garage. Time to get…awesome!
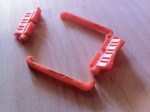
I loved my Nixon watch; it told me the time, it told me the date, and it looked really good in its safety-orange brightness. I always had people ask me “is what some sort of medical device”, and even “what does it do?” and I always loved replying “it tells me what time it is!” Then one day it broke. Not the electronics, but a small band of plastic holding the electronics to the band broke in two different places.

Unlike old, boring watches where the band could be changed out at will, this one was had a patented process applied that made the rubbery-plastic band physically attached to the hard-plastic “sled” using little loops of rubber, making for a cool, one-piece appearance. Unfortunately, this process also meant that I couldn’t just go out and get a new band for it, and the Nixon site no longer had the safety orange version.
I opened up my broken watch a month or so ago, and at that time thought that it was too daunting of a task to try to repair — the part had too small of features, I couldn’t get the electronics out without cutting the loops inside, and general worries that I’d totally screw it up. After a month of it sitting in a drawer, however, I realized that I might as well try to fix it; it was either that or let it just sit there, looking sad every time I opened the drawer.
I unscrewed the four screws holding the back panel (battery cover), then four more screws holding what remained of the broken sled to the electronics enclosure. Having it free, I got my digital calipers and started writing down numbers. The values were fun sizes like 3.36mm, and 2.14mm; no whole numbers here. I still worried that I wouldn’t be able to get the precision I needed when I got to my printer, but I pushed on.

Sled design in SketchUp
Taking my numbers into SketchUp, I pushed and pulled, added holes, added inset walls, the works. There was a really elegant curve to the part that went inside the band, and where the rubber loops went through. Since I needed to slice those loops off to get the original out, I didn’t need to put the small, elongated holes in this area and could leave it solid. I was shocked at how fast I was able to get the piece modeled and looking good; a testament to both the easy nature of SketchUp and working with it so much to know how to look at a piece and quickly build it out. There were several areas that I had concern over — the thinness of the inner-walls around the screw holes, and the overhang of the band attachment point. I figured I’d just print and see what happened.

Sled rendering in Indigo
To the 3D printer! I knew that I’d need support, so I added a raft, set the parameters for no extra shells and 100% infill, and hit “print”. D’oh! Errors! Given all the pushing and pulling I did in the model, it was no surprise that there were issues with it that I couldn’t see. I ran the model through Netfabb’s awesome cloud STL repair service and had it back almost immediately. Let’s try the print again. Success!

Long-time readers may notice that I’m printing in white (“natural”) ABS, even though I’ve printed before with the same safety orange as the original watch. I had white already prepped from another print, and just went with it. Part of me didn’t think it was going to work at all, and the other part thought… well… the other part of me was just plain lazy.
The piece took 33 minutes to print, with a portion of that being the slow raft. Still, from the time of sitting down to take measurements to the time the print was done and the raft peeled off was less than two hours. That kind-of thing always makes me happy; it’s just crazy to think where we’ve come.


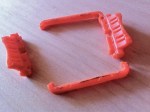
The screw holes looked good, though the outer overhang didn’t actually touch the raft supports, so there were a few dangling noodles to clean up. Time for the big test — does it come close to fitting? No! Well, the overhang fit perfectly in the band, but the main part wouldn’t fit around the electronics enclosure.
So, I was worried about the inner walls of the screw holes being too thin, but as it turned out, after printing they were actually too wide. Despite printing with no extra shells, there were two extrusions per wall, and that made them just a wee bit too big to fit in their areas around the electronics. I had to take an X-Acto blade to the walls and slice off just a little bit. Once fitted around the electronics, I was able to put the screws back in that held the sled firmly in place. I placed the battery cover back on and screwed in the remaining screws. It worked!

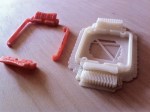
The next, and final step, was to glue the sled back into the watch band. Since I had sliced off the rubber loops (and had no method to actually re-attach them anyway) I resigned myself to just using some super-duper glue substance. I had a tube of crazy-strong “gel” glue, but it was old and had hardened. I also had some model airplane glue (from a previous project, not from making a model) and it seemed fine. I squeezed a little in the band and put the sled in place. And waited. The next morning the glue had dried! But it hadn’t actually stuck to anything. Bummer. And now it sits, waiting for me to go get some better glue options, maybe even an epoxy.
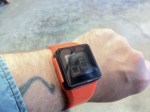
Whatever glue I end up using, the fact that I have been able to repair my most favorite watch with surprising ease, made possible only because I have the most awesome tool ever — a 3D printer, is cause for much celebration.


-

- Sled design in SketchUp

