
After getting settled in our rental home in Redmond, it was nice to be able to get my Thing-o-Matic out of it’s Pelican case and set up to print some fun things. But as I started to get things rolling, something just wasn’t right. Perhaps it was the software update I did to the latest ReplicatorG; perhaps something physically shook loose in transit. I had a pressing need to use my 3D printer, but couldn’t. What to do?
About a year ago, we moved from our home into a rental condo in downtown Austin, TX. During that move, the movers lost one of the small shelf holders in our IKEA cabinets, and, as you may recall, I designed one I could print to replace the lost one. This move was different. We disassembled the cabinets with the movers, placing all the shelf holders in a plastic ziplock bag and wrapping each shelf separately. All was good and we wouldn’t have the same problems as last time. At least that’s what I thought. Our movers, for whatever reason, decided that once they got the cabinets to the warehouse they would be better moved if they partly re-assembled them.
You see, they took some of the shelf holders and put them in one of the cabinets, along with the shelves. The then put just the shelves in the other cabinet and only a few of the shelf holders. They left six or seven holders in the plastic bag. Oh the mysteries of professionals.
Needless to say, during transport the shelves and holders went flying everywhere inside the cabinets, denting the thin metal walls and shelves, and losing the shelf holders in the cavernous interior of the moving truck. Great.
This was the first thing I had thought to 3D print after getting my Thing-o-Matic up and running. Thankfully I had my shelf clip model already made, knew they worked really well, and could just print out the eight that I would need. This time around, however, the places that I needed holders were in a wider cabinet than the first time around. This size of the metal shelf holders weren’t any different from the more narrow cabinet ones, but required two shelves resting on top of one holder, side by side. Due to the now-slightly-misshapen cabinets, I was having a hard time getting two shelves to rest on the single shelf holder while still trying to get cables for various electronics in place behind them. I realized I could not only print the needed replacement pieces, but make them slightly wider and better suited for two shelves.

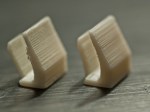
Old and New Shelf Holders
I did a quick measurement and simply added a couple of millimeters to each end of the clip, giving a small but needed amount of space to keep two shelves happy. I also re-designed the body of the shelf holder, making it a little more “designery” than the original version, and eliminating unnecessary bits. I know I’ve gone on about trying to be too clever in design, but I hadn’t designed or printed anything for some time so I felt justified just this once.
Going to my Thing-o-Matic, I warmed up the extruder and build platform, fed in some filament, leveled the bed, and pressed “print”!
Then the weirdness began.
It started with a really nasty vibration as the printing platform moved side to side; it sounded very different than normal and the drive belt was almost blurry from shaking so rapidly.
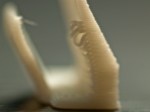
 At the same time, I was getting a weird overhang at the start of some of the layers on my printed piece. I had read on the MakerBot Operators Google group about a Comb bug in newer versions of Skeinforge; was this that bug? I got through one shelf holder and it looked “okay”. It had some weird curly threads sticking off it, wasn’t terribly uniform layer-to-layer, and just seemed “off”.
I printed a calibration cube and it was okay. I quickly drew a calibration cylindrical donut and printed that. This object helped clearly show that something was terribly wrong.
 The first issue to tackle was definitely the vibration. That, to me, wasn’t good for the long-term health of my MakerBot and could be tied to the bad alignment issue. I quickly posted to the MakerBot Google group and got some good suggestions for what to investigate: belt tension, stepper motors, etc. I started with the basic task of cleaning the rails, tightening any loose bolts, and checking wire connections. I moved on to taking things apart to make sure bearings were clean and not broken. All the while I’m testing the printer by making more shelf holders. And all the while the vibration was still there and the holders still had curly bits hanging off them.
Finally I got serious and started disassembling the heated build platform to get to the X-axis belt connections. I removed all of my thumb wheels, disconnected the cable harness to the heated bed, and pulled the bed off, putting it aside. Then, to get to the bolts that hold the platform to the carriage, I jogged the X-axis motors. And there was no vibration! Thinking it a fluke, I jogged the platform back and forth several times and had no vibration at all.
Curious (and somewhat hopeful) I placed the heated bed back in place and jogged the platform. Still no vibration. I then put back on my thumb wheels and tightened them down and the vibration had returned. I loosened all the thumb wheels and tried again and no vibration. One by one I tightened down the thumb wheels until the vibration returned.
It struck me that in preparation of getting my printer ready to print, I had done a pretty rigorous leveling routine to try to get the heated bed more level than it had ever been. My lock nuts on the bed were still in the places I had them when I did the leveling and it was at the point that I got all thumb wheels back to these points that the vibration returned. I took off the lock nuts and re-assembled the bed without them and no vibration. I printed my calibration ring and it was a circle again!
Finally I went back to my shelf holder and printed it, expecting to now only have to deal with the Comb bug. But to my surprise it came out perfect! The two problems were caused by the same thing — a too-tight heated build platform causing the X-axis to stutter as it moved from left to right, making warped circles and misaligned layer starts.

A bad one on left, the good one on the right.
Of course by this point, through all the tests, I had printed so many shelf holders I only needed one more. So my final print was the last. Now I have shelves in our cabinets again and the side-by-side shelves have never been happier.


-
- A bad one on left, the good one on the right.


The Al build plate and the PCB both expand (but at different rates) when heated. If they
are tightly attached to the X carriage, then they will distort the shape of the X carriage and consequently effect the alignment of the X carriage’s bearings. In the standard MBI design for the X carriage, the issue is exacerbated by the fact that the bearings / linear guide rods are overconstrained (4 bearing surfaces when only three are needed). Sounds like loosening things helped to reduce the coupling between the PCB/Al plate and the X carriage.
There are some nice 3-bearing X carriage replacements at Thingiverse which address the issue of overconstraint. And attaching the PCB/Al plate to the carriage using a mechanism which allows for thermal expansion/contraction might be a good idea as well, but you don’t want play during printing.
That’s some great info right there, Dan. Thanks! I’ve looked at some of the linear bearing replacement stuff to get into Jetty’s firmware acceleration, but just haven’t felt secure enough in my dis-assembly/re-assembly skills 🙂
Hey Greg,
I noticed the same thing when we were printing the included sample files with the Replicator. Beethoven’s chin looked just like your samples. It did not happen on the rocket but it seemed to happen when there was an overhang or where it was unsupported. Just a thought.
Brooks