
When you start work at frog, you are given your choice of computer type, desk type, and a selection of useful desk items, including a nice IKEA TERTIAL desk lamp with a nice, bright, CFL bulb. These lamps are great at illuminating your desk, but they also can cause pain to any coworker who happens to be on the wrong side of the shade.
Because the CFL bulbs in these lamps are longer than the shade, a small bit of bright bulb sticks out the bottom. So, to counter this, and to get the best angle to light up the desk, folks tend to pivot the lamp so as to be slightly away from their face. This has the side-effect of causing more of the bright bulb to be showing to people on the other side of the lamp.
In a subdued-lighting environment (frog is a design firm, after all), these lamps create really bright “hot spots” throughout the studio. Time for a solution.
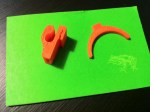
These are “lampets”:

The main part is a small piece of plastic that happily clips onto the rim of an IKEA desk lamp and securely holds a business card, piece of paper, or family photo in it, making the perfect, customized, light blocker. Optionally, there is a rounded extender to keep larger pieces of paper held away from the shade to help with when the shade is tilted at bigger angles (you don’t want the paper hanging down on the warm-ish bulb [CFLs seemingly don’t get hot enough to ignite papers, luckily]).

A "lampet" holding an instant photo as a light blocker.
You can see that when holding an instant photo (Fujifilm FP-3000B, for you photogs) the hot spot is well blocked, leaving just the ambient outer light. Normal paper and business cards create a nice, diffused light that is even more soothing (and colorful in the case of frog business cards – see gallery).
Problem solved. Now let’s talk design details.
The devil in the details
When I had the initial idea for printing these, I imagined a single piece that was all flowing together and pretty. When I got to the computer and starting thinking about the 3D printing process, I realized that wasn’t going to work.
To design the piece the way I originally sketched it–with long, flowing “tendrils” that mimicked the shape of the shade to support floppy paper–would have required the use of a raft and support structures due to the overhanging clips on the front and the back; I couldn’t print it on its side as designed.
This is where past work with making modular items came to mind. I could make the “tendrils” a separate piece that connected to the main body, allowing me to print the body on its side, and the paper support flat on its back.

The first version of a "lampet"
I measured the lip of the lamp shade and went to SketchUp. In 10-15 minutes I had my first version. It was simple, curvy, and pretty much what I had imagined, just in two parts. So I 3D printed one and, well, this is why I love this stuff: I have a lot to learn about industrial design, and this makes me learn it the hard way. See, the piece printed beautifully, but just did not fit onto the shade. My measurements were right, I just didn’t allow for being able to put the piece onto the shade! Big fail there.
Instead of trial-and-error in SketchUp, I decided to 3D print a few more versions of the object at different scales out of ReplicatorG — 2x, 1.5x, 1.2x, finally settling on 1.15x as the right size for the opening. The area that would go around the lip itself was a little large, but as I read varying sizes going around the rim of the shade, this wasn’t a big deal to me. I did find, however, that as designed, the piece was able to rotate too much, allowing gravity to keep it perpendicular to the ground at all times; not what I wanted.

Second version of a "lampet"
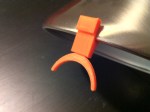
So I added a support extension to the curvy side. This should do the trick! And it did. Also, if you look (very) closely, you’ll also notice that I trimmed a bit off of the round bump in the outer clip that was to hold the paper. I found in the first version that this bump was so large that it was joining with the back plate when printed; a second design fail. I 3D printed another one and this time the whole piece would stay in-line with the shade, regardless of tilt. But it was kind-of ugly in its squareness.
I decided to round the back portion a little (well, a lot really) and change the single bump into three small bumps as the one allowed paper to go in, but wouldn’t hold it in place. I 3D printed this version and YES! This was it!

Final version of a "lampet"
A win for Desktop Innovation
What I love about the above is that all of these iterations took place over the course of an hour and a half. Each 3D print was taking around 10 minutes, and I was able to adjust in SketchUp very rapidly (it’s not a complicated piece, really).
This, to me, is still the most amazing part of owning a personal 3D printer (besides the fact that I actually can own a personal 3D printer). To think of something, design it, 3D print it, hold it in my hand, test it out, re-design it, and so on until it’s right — all at an incredibly rapid speed — is astounding.
Granted this isn’t a large piece, nor it is part of a larger system, but it does solve a problem, and with a half-day of 3D printing, has the potential to make a lot of people happy.
-

- Final version of a “lampet”


-

- A “lampet” holding a business card
-

- A “lampet” holding an instant photo as a light blocker.
You can download this final version of the “lampet” on Thingiverse.

